Showing posts with label crafty mama. Show all posts

Wednesday, December 23, 2015

Mum.


Made a pair of hand-painted linen napkins for my mum's Christmas present. Something special for her and hubby to use at the table or in front of the television. ;)

Wednesday, September 3, 2014

make the things.


I've recently been on a crafting rampage, armed with sharpie pens, watercolors, old fabric, and a much-abused sewing machine. I'm doing this mostly for myself, as a way to combat the stressed of chronic illness, but also for the not-too-distant future: my hope is to have an Etsy shop up and running by ________ date. Actually, I'm rather terrified of setting a date and then not being able to meet it for some unknown reason. So I'm keeping the goals small, for now. Stock first. Set date later.

I've been brushing up on online selling, and taking some cues from some of the successful shops I know of. I read interviews with these amazing sellers, and I've often come across the notion that if you are to open a shop, it should focus on just one or two things. I've narrowed mine down into the realm of upcycled/handmade garments and decor + one-of-a-kind watercolor illustrations. But I wanted to ask you all, out of curiosity: do you like when Etsy shops feature a variety of items, or just a few? What attracts you personally to a specific Etsy shop? And are custom orders a must for you? I'm just curious. I know that however I go about it that my merchandise is bound to vary from time to time, as I'm very keen on using what I have available, or in other words, making something out of nothing.

It's a strange feeling, to feel some opportunity and change on the horizon, but to not know exactly what that means yet. I suppose my only real hope for the future is to have a bit of variety. Living with pain every day is something that often feels insurmountable. I struggle daily with feelings of anxiety and uselessness and, sometimes, despair. Up to this point in my life I haven't felt very much in charge of anything, having no choice but to let my body dictate each day. It's taken me a while to find my footing, and to come to the realization that it's okay if I don't do or live like everyone else. I don't have to--it isn't required.

Sometimes it seems like everything I've been through until now has been practice and I'm only just starting to really live.

xo
Brit


Monday, January 6, 2014

Saturday, November 30, 2013

popsicle stick wreaths.


You guys, we are sick. All of us. We managed to make it through Thanksgiving with only a few sniffles, which have morphed into full-blown head colds today. This puts a bit of a cramp into my original plans of spending the remainder of fall vacation crafting Christmas-y things while drinking cocoa and listening to old holiday tunes. Thankfully though, there are crafts that can be done while sitting on one's arse, and that can be completed in about 20 minutes or less, depending on your level of commitment.

Enter: popsicle stick wreaths, reminiscent of your first years in school, no doubt.


These are pretty self-explanatory, in my opinion. You'll need a hot glue gun, popsicle sticks, paint or paint pens (optional), and various sundry items to festoon your wreath with. I grabbed buttons, twigs, and pom-poms because that's what I had lying around, but you can use whatever you want.


Paint the sticks, if you've chosen to do so, then glue them end-on-end into a hexagon (a stop sign shape). Pick out your sparkly goodies and glueglueglue until you've reached your desired look. For the little souls creating these, I recommend that they arrange their decorations as they want them, then hand the whole thing over to an adult to glue. If they're hell-bent on gluing it themselves, elmer's glue is an option. although I find that the wreaths don't stay together as long.


Beautious!!! Now loop a ribbon around the top and hang them in your abode. Relax and drink a glass of wine. Or in my case, garlic and honey.

Cough.

Tuesday, October 1, 2013

thrifted and made.


Wow, look at that corny smile. I'm such a dork. Anywho, just wanted to share my outfit from this morning/afternoon (I'm schlepping around in yoga clothes currently).

Top: Salvation Army
Skirt: Goodwill
Clutch: made by me.
Necklace: made by me.
Shoes: Target.

Wednesday, January 16, 2013

homemade face wash.


From left to right: cinnamon, nutmeg, tumeric, dried lemon balm, chamomile, and sugar.


I love whipping up a quick face wash with things I have around the house. The cinnamon and nutmeg are natural anti-fungal's and anti-inflammatory's. The tumeric I added to give my face a little glow, to beat back some of this winter-white complexion. (Though, if you choose to use tumeric, go easy. Add to much and you'll look jaundiced.) Lemon balm and chamomile are calming and reduce redness. And I threw the sugar in there to give my skin a little exfoliation. You'll see above that I also chopped up some oats and added those in, which are wonderful for fighting itch and inflammation. I didn't do any actual measuring here, but I'd say I had close to a heaping tsp. of all the ingredients.

Directions: chop and/or grind the chunkier ingredients. Throw everything in a jar and shake to combine. To use, wet your face and apply using your fingers. Massage in slow circles for roughly 30 seconds. Rinse. Keep this tightly sealed for one week.

***IMPORTANT***
If you have very sensitive skin, please keep the cinnamon to a minimum, as it will inflame whatever area you apply it to. I mixed everything so that there is a ton of the other stuff in addition to the cinnamon, therefore a bit "diluted", if you will.

Friday, November 30, 2012

new curtains.


New curtains for the studio, made of vintage sheets. In the late afternoon light, my studio looks like the inside of a rose.

Tuesday, November 13, 2012

makings.


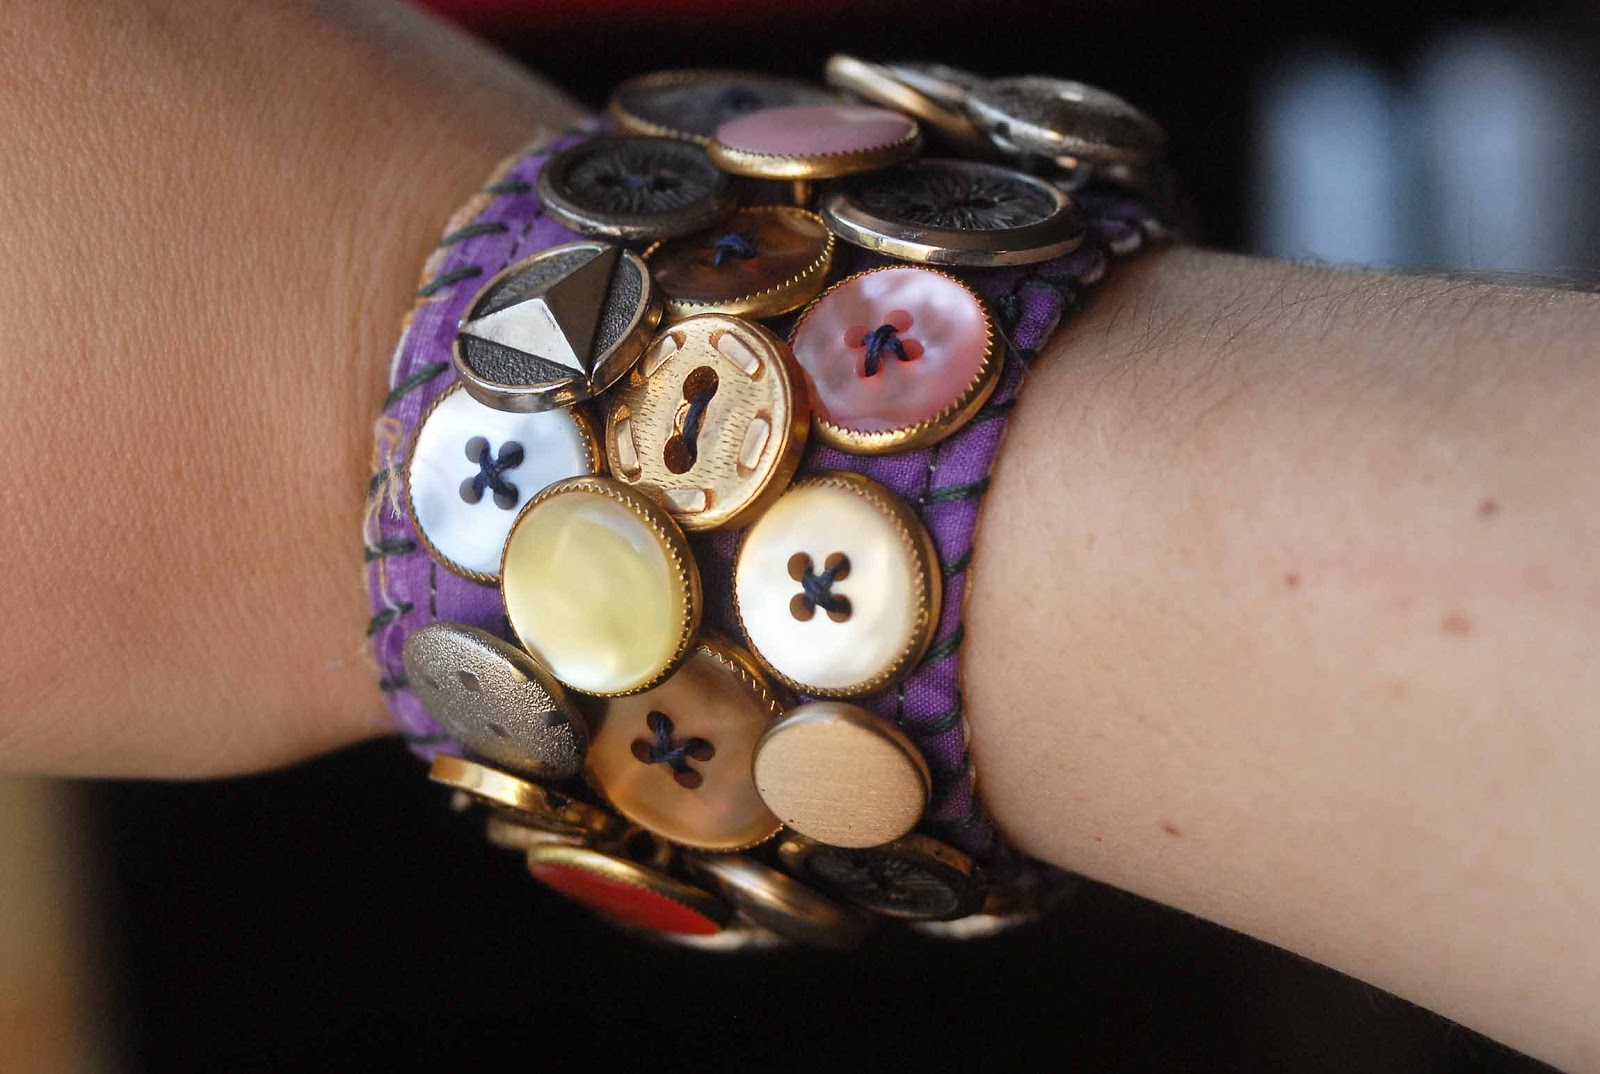
Top to bottom: a button cuff bracelet, inspired by something I saw on Pinterest. Repurposing an old binder of Hayden's, and making it my own with some painted feathers. Last is a "Love" watercolor I started over a month ago and finally finished last week.

Thursday, October 4, 2012

gathered smock top.

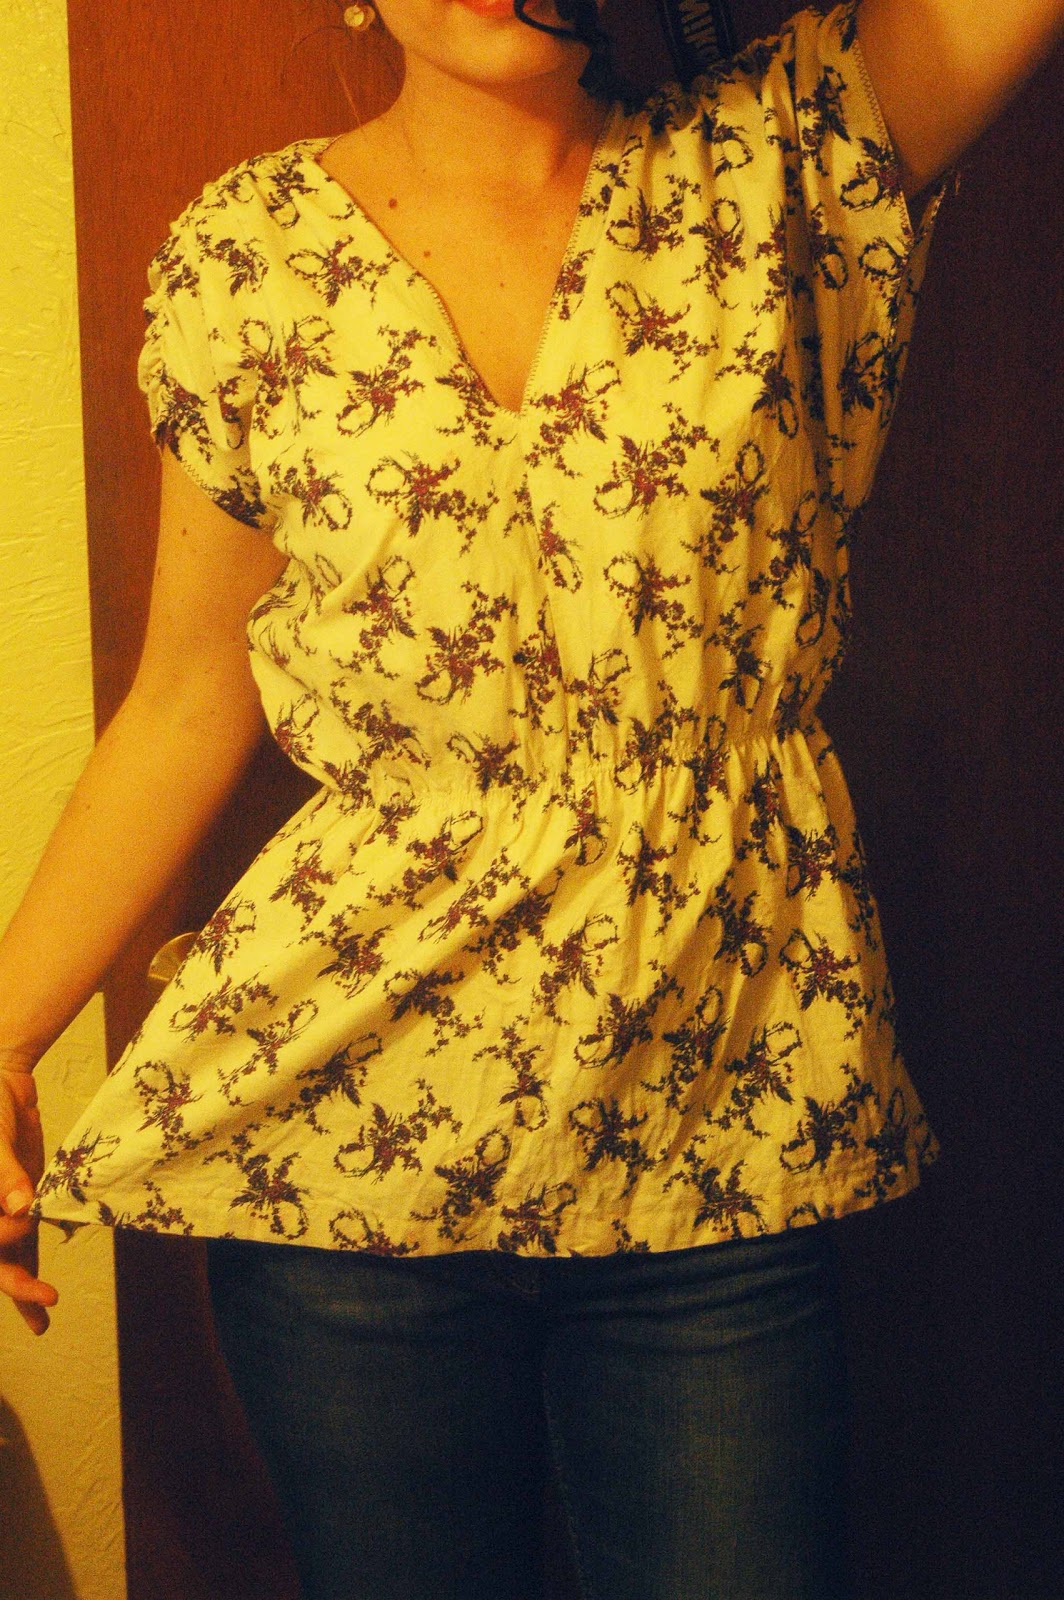
So I feel really silly for even posting these pictures because, honestly, they suck. Especially if I stop to compare them with all the fabulous "DIY" and sewing pictures by other bloggers out there. But oh well. There is no sun to be had this week and I became really impatient waiting for perfect picture-taking conditions.

This is a simple, smock-style top, basically two long rectangles sewn together at center front and center back, leaving a 'V' for the head, and then stitched up the sides with enough space left to fit the arms through. I gathered the waistline with elastic and did the same with the sleeves. I also tea-dyed it, as I didn't really like this fabric's blindingly white background. I like the way it turned out. It looks great with jeans, cinched with a belt at the waist, or with boots and a little cardigan for cold weather.


On another sewing note, I printed this free pattern from the Colette blog. It's been all over the internet for a long time now, and I want to finally try my hand at making it. I'm thinking of lengthening it into a dress...because I really need to make another dress. Right.


Tuesday, June 5, 2012

tea towel tote bag

I found this enormous, Pennsylvania-Dutch inspired tea towel at the thrift store, and had to have it. It's made out of really strong linen. It's been sitting on my shelf of found fabrics for a few weeks now, waiting for the proper idea to form. Finally a realized that it would make a perfect tote bag, which I really needed anyhow.


Sometimes, the way I limit my work to what I can find, either in the garbage or at thrift stores and flea markets, kind of bums me out. The temptation to just go to the fabric store and get everything new is so strong...especially when I'm looking at some of the beautiful sewing books out there, and every project calls for such-and-such yards of such-and-such type fabric. But I'm reminded of how much creativity resides within me, within all of us, if we just make do with what we already have. The compliments come pouring in, and I realize I've got to be doing something right.

Tuesday, May 8, 2012

in cuffs.


An attempt to use-up all those fabric scraps littering my studio floor.

Sunday, April 29, 2012

big hoop, little hoop.


After making Anakin Skywalker die for the trillionth time, we embroidered together.

Sunday, March 11, 2012

the dye-vat.


There a few things I love more than dyeing fabric. You never truly know what gloriousness you'll end up with.

Thursday, March 1, 2012

a new dress.


I can't stop making dresses. It's pretty funny because I won't be able to wear this summery concoction for at least another three or four months.

Saturday, December 24, 2011

book page ornaments.

These will be the party favors for my Christmas day brunch. Everyone will get one on their plate, and each are completely unique.

book paper, thread, seam binding, squares of an old pastel sketch i didn't like

Have a good Christmas everyone. :)

Monday, February 28, 2011

Fabric scraps: 2 ideas

If you're like me, you try to recycle/upcycle whatever you can. In my case, it comes from not having much in the first place, and really having to adopt the "waste not, want not" attitude.

So here are two quick, easy, and not terribly original ideas for using up those scraps of fabric that are just a little bit too small.

Idea #1:

Fabric necklaces.


As I'm sure you're aware, there's no rocket science to this craft. Just braid together strips of fabric that you like to a desired length. Fold the ends over, stitch, and trim. I stitched on ties (which you can't see here) in a coordinating fabric. That way, I can wear it either short or long. Then I made a little flower out of another strip of denim, and sewed a shell button to its center. Ta-da! The nice thing about this is that you can make them to suit your own tastes. You can also use a fabric that doesn't fray as much for a crisper look. I just prefer the organic, sort of rustic feel.

Okay, and Idea #2:

Fabric book-covers.


Remember when you were in school and you covered your textbooks with brown paper bags? To make these fabric book-covers, you're using that exact same method. Just take a rectangle of fabric, lay your book on top (open), and mark where you need to fold. Remember to fold the top and bottom in first, if needed, THEN fold in the sides. I used a running stitch; one straight across the top, one straight across the bottom. Remember to measure the width of the fabric with your book closed. Remember that? How you'd go to close the book and the back cover would pop out of the flap because you never measured the paper with the book closed. So close the book, and use a pencil or whatever to mark where your flaps will fold over. I went back later with a fabric pen (best things ever!) and drew a free-handed design, but you could leave it plain or embroider it or...you get the picture. The possibilities are endless. Slide your book in and--instant style! (If you have the time or desire, making a cover for all your books looks AMAZING on a shelf. The fabric adds a special texture and dynamic that paper just cannot. You could even make them with all the same fabric, which is a great way of tying all those mix-matched covers together.)

There you have it. DON'T THROW THOSE SCRAPS AWAY!! Or I'll find you.

Seriously.

Wednesday, February 16, 2011

he's FIVE.

I'm afraid I'll be too busy to post on Hayden's actual birthday, so I'm writing this now.

Five.  I think I've asked before--how did this happen?

hayden; feb 2011
And yet, my son is awesome at five, if I do say so. He's energetic and excitable and intelligent and seriously quirky. He loves trains and mommy's dark chocolate stash and going to the Salvation Army. He calls the leaves from japanese maples "tree stars".

tuckered out

For a few years, I thought a little brother or sister would be joining Hayden in his daily adventures. I know now that that might not be possible for me. But if Hayden is it, if he is my first and only child--I'll take that. It's more than enough. I am blessed to be his mother.

I also wanted to show you what I made for Hayden this year. I usually try to do that--make a gift. I find it a lot more meaningful than another plastic doo-dad from Target or Wal-Mart.

before

So I found this stool at the Salvation Army for under five dollars. All the finish was nearly worn away, which is perfect, and its construction is amazingly strong (I jumped up and down on it and it didn't wobble a bit). I'd been thinking Hayden needed a new stool for the bathroom, for help with teeth-brushing and hand-washing. I knew this was just right.

I brainstormed and looked at different colors for a while. Then I finally came up with this:

after
I sanded it lightly, painted it, applied the train image (found it in an antique railroad book), and lacquered it. I think it turned out wonderfully, better than I expected. I hope he likes it, although I'm sure he will. Another thing I love about Hayden is that he's delighted even when the gift in question isn't a toy. That and he's used to mommy making him odd things.

Off to the store I go for cupcake ingredients. <3

Monday, February 14, 2011

whole lotta craftin' goin' on...

Happy Valentine's Day everyone!! We honestly haven't partaken in much festivity here...there was a badly botched breakfast of heart pancakes, a big interruption having to do with my husband's job, and a million other issues, so let's just say it wasn't a big, squishy party.

No matter. Crafting always cheers me up. I wanted to show you all a few of the things I've been working on.

chamomile and mint salve

I made my very first batch of chamomile salve last week! This is exciting to me because a) my skin is too sensitive to use commercial products all the time, and b) buying natural products from other producers is waaaaaaay out of my budget at the moment. So I made my own. My feet, hands, lips, etc., are thanking me profusely. (I'll try to post the recipe over the next few days--it's incredibly easy!)

altered onsie

This is a onsie I made for my best friend's baby girl.  I actually made it last month but only just recently gave it to her. She loved it! The quilted circle was originally supposed to be a square, but when I placed it on the top it looked sort of strange. So I turned it into a circle instead.

onsie detail

It was still missing something when all was sewn, so I stitched on some vintage buttons. I can't resist adding them to pretty much everything. You DO NOT want to know how big my button collection is...it's sort of ridiculous/obsessive.

free-handed painting in my kitchen

I've also been adding little hand-painted touches around the house, mainly in the kitchen.  I love folk art and would like to see more of its influence around our abode.

hand-painted butterflies

I can't stop. Really.

hayden, painting valentine's
And of course, I'm always feeling inspired by my little man, who creates with this admirable reckless abandon. We should all aspire to create like children, shouldn't we?

That's all for the moment. I hope your day was wonderful. <3